

Please note: when you activate or deactivate self scheduling, this will activate or deactivate the ability for students to make requests for appointments as well. However, unlike self-scheduling, there is no limit regarding how many days into the future students can make appointment requests for.
To start, you will need to be logged in as a site admin. Go to Manage Students, then select the button on the top right of the screen that says 'Self Scheduling Manager.' If you want to use this feature, please keep in mind that you will need to have self-scheduling permissions activated on the Advanced manage students page. This permission can be set for some or all students in the 'Manage Can Self Schedule' box.
Once you're on the Self Scheduling Manager page, you will see a box for each day of the week. Note that each day is from 12:00am to 11:59pm.
Let's review some screenshots to see how this feature works.
What should the status be for self scheduling/appointment requests at midnight? There are three different options available.
- No Change From Prior Day - whatever the status is on the prior day will be automatically carried over to the selected day
- Set to Activated - at midnight, self scheduling/appointment requesting will be activated
- Set to Deactivated - at midnight, self scheduling/appointment requesting will be deactivated
Deactivated All Day - when this option is selected, self scheduling will be deactivated all day long for the selected day. (Each day of the week can be edited.)
Activated All Day - when this option is selected, self scheduling will be activated all day long for the selected day
Also, when this option or the Set Time option are selected, you have the option of setting how far into the future a student can self-schedule.
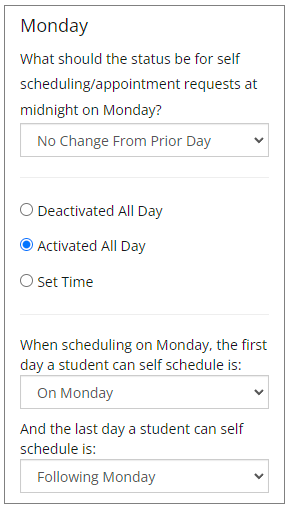
In the screen shot above, when the current day is Monday, the students will be able to self-schedule all day long. But they are limited to the days that they can schedule based on the First Day and Last Day options selected. Based on the options selected above, students will only be able to self-schedule for that Monday. Let's look at another example:
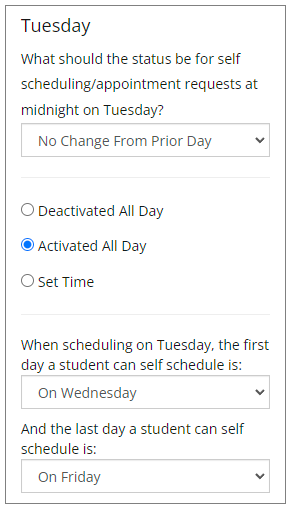
Based on this image, we see we are setting up self-scheduling for Tuesday. The students will have access to self-scheduling all day Tuesday. However, because the school doesn't have a flex period on Tuesdays, they've chosen to limit the days the students can create appointments for. In this case, students can create appointments for Wednesday, Thursday and Friday. Let's take a look at an example with a longer range:
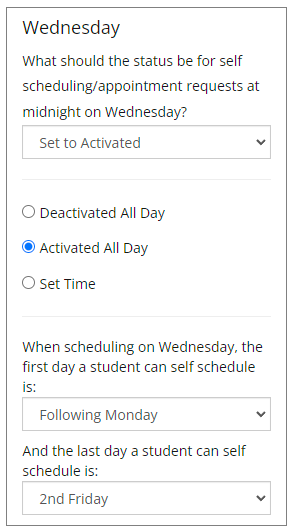
Here we see that when the current day is Wednesday, the students will be able to self-schedule all day. However, the current week cannot be modified by the students. They are only able to self-schedule starting on the following Monday and ending on two Fridays from the current Wednesday.
It's a very flexible approach and, once you use it a few times, it's very easy to work with. However, there's one other option to review, Set Time.
Set Time - when this option is selected, the user will be able to determine, for the day being edited, what time of the day self-scheduling will be activated and deactivated. Let's look at a screenshot:

We see that we're working with Thursday. The Set Time option has been selected. Based on the day range, when it's Thursday, students will be able to self-schedule for the following Monday and Tuesday.
However, the school has also limited the time period that self-scheduling will be activated for. The complete picture is when the current day is Thursday:
- Students will be able to self schedule from 8:15 AM (based on the school's time zone) until 9:15 AM, when self scheduling will be deactivated.
- Students will be limited to only self scheduling for the following Monday and Tuesday.
Let's review one more situation. For this example, we're going to assume that Thursday was set to allow self-scheduling all day. Review the following image:
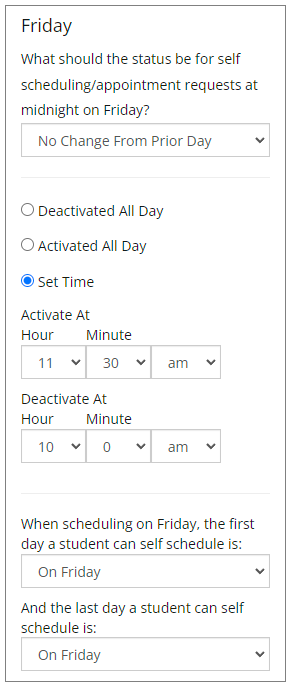
Do you see what's going on here? As we stated above, students had self-scheduling activated as of Thursday. Coming into Friday, self-scheduling is still active. Self-scheduling remains active until 10 AM, based on the schools time zone. It will then be deactivated from 10 AM until 11:30 AM. At 11:30 AM, it will be reactivated.
Activate At/Deactivate At
One point to remember is, if you set the Activate At, you MUST set the Deactivate At. And vice versa, if you set the Deactivate At, you MUST set the Activate At. The process needs a starting and ending time in order to work properly.
Comments
0 comments
Please sign in to leave a comment.